Create your own custom designed forum using Webflow's Designer & CMS. Improve SEO & community engagement by allowing registered users or guests to create new pages of content with rich text on your Webflow site.
Customize the styling & layout of every element of your forum
Allow users to create new pages of forum content with rich text via the CMS
Display Author Data from Outseta and Memberstack
Name, avatar, & custom fields get automatically displayed in author elements for forum posts
More ownership of your community over 3rd party tools like Slack
Optional guest posting
Endless customization possibilities
With over 40+ optional settings and features, plus the design flexibility of Webflow, you can create a forum experience that suits the needs of not only you (as a site owner), but also your users. Add commenting and upvotes to forum posts to ignite further forum engagement.
Potter ipsum wand elf parchment wingardium. It fire-whisky plums large seek. Hermione venom firs’ hall hat. Newt you’ve owl peg-leg mewing candles cup. Thieves it wizard of a his pumpkin.
Finding Supersparks was a huge win for us, such a simple and effective way to extend Webflow and boost our user engagement and UGC. It integrates seamlessly with our no code stack and once configured we haven't had to worry about it at all, it just runs in the background for us. Ian is one of the most hands-on founders and this product's features are not to be underestimated, they've already helped us massively in growing and engaging our community.
The Supersparks team listens to their customers and are very responsive. The 100% customizable forum capabilities with Webflow is one of the strong points of the Suparsparks tool - plus, a much-appreciated modern design and intuitive use allowing smooth navigation to top it all off ! I would recommended without hesitation. I’m very proud to fly the flag of Supersparks in the land of Molière (France)
I came across Supersparks when I was looking for a discussion board solution for my website and it met all my criteria and more. I really loved how seamlessly it integrated into Webflow and was able to match up with my site’s design, color scheme, and branding.
Supersparks fills the gaps with Webflow when it comes to community / user generated content. It’s simple to implement, especially if you are familiar with Attributes, and opens up a whole new world of possibilities for Webflow websites.
We have loved using Supersparks for Caffeine. It's super easy to implement and the team is really responsive to any questions. Excited to have such an easy comments feature that we can roll out on future projects too.
Supersparks is a great tool that I always recommend to clients. It saves hours of time in Webflow and the team is super responsive when we have questions.
Supersparks is such an essential part of my website—I'm 100% sure that collecting reviews and ratings have helped me climb search rankings. The Webflow integration is seamless and going live is incredibly easy. Big kudos to Ian and the team for a killer product!
I used Supersparks together with Webflow and Memberstack to build a forum platform. The team made the entire setup super intuitive and easy to get started with, while also giving me the extra functionality I needed without the headaches. Supersparks really tied everything together and made my project possible.
Less than 2 minutes … That’s how long it took me to add a comments section to my blog articles. It seemed surreal, especially considering the long hours I had previously spent trying to figure it out by myself. Supersparks is awesome, especially for those who don’t have extensive Webflow background.
Really nice addition to my Webflow website and great support by the team! Fast and reliable. Curious what the future will bring in terms of new features. I would highly recommend it!
Supersparks has been an integral part of getting my startup online. The team has been so quick to respond/follow through, and are constantly improving Supersparks in ways their customers need.
How to setup a forum in Webflow
In the past, Webflow would be one of the last tools people would think of for building a forum. But with the emergence of new 3rd party apps, Webflow is now a fantastic option for building a forum, especially when you consider the following advantages it possesses over other website, web app, & forum development tools:
1) SEO - If you are building a forum, chances are organic traffic will be one of your most important acquisition channels. Out of the box, Webflow offers best-in-class technical SEO and tools (clean code, fast page speed, meta data, minifying, etc.) that maximize the likelihood of new pages of user generated content not only being indexed on search engines, but also ranking higher.
2) Design flexibility - This is a matter of preference. But if you wanted to create a forum with unique design that matches your brand, instead of directing users to a community platform with generic out of box design, Webflow is a fantastic choice. With Webflow, you can custom-design every aspect of your forum in a visual editor, completely no-code.
3) No cross-platform friction - When Webflow sites already own a userbase, through a tool like Memberstack or Webflow Memberships, syncing user data with community tools (like Circle) requires cumbersome Zapier or Make automations. Or with Slack or Discord, your users need to sign up again to another 3rd party tool. Through the solution in this tutorial, you have memberbase within one tool without needing to sync data across platforms.
How can I create a forum on my Webflow site?
The tool we are going to use in this tutorial is Supersparks, which enables forums within a Webflow site in minutes and gives you the freedom to custom-design every aspect of your forum in the Webflow Designer. To see this tool in action, before getting started, check out this live example of a forum built with Supersparks & Webflow. In addition to covering the basics, this tutorial will also explain the different configurations & settings that are possible through this solution.
There are two installation methods: 1) From a template (new or existing site); or 2) From scratch, which we will cover in this tutorial. After signing up to Supersparks, you can get started with the installation 👇:
Template Installation (new site)
If you are looking to create a new site, we recommend starting with a template, tospeed up the process of designing and developing a forum. All of our templates can be adapted in the Webflow designer. If you would prefer to add a forum to an existing Webflow site, we recommend skipping to the next section of this tutorial about 'from scratch' installation.
To help guide you through the rest of the process, check out the tutorial below:
From scratch installation (existing site)
The rest of this tutorial will be focused on implementing Supersparks with the 'from scratch' method. This method is ideal if you would like to add a forum to an existing site.
Video tutorial
In case you get stuck, below is our step-by-step tutorial for installing a forum using the from scratch method.
Create a new spark
After authorizing Supersparks to your website, click 'Add Spark' on the homepage. Once on the app select screen, select 'Community Discussions', and click create spark.
Supersparks' app select screen
Step 1: Connect CMS Collection & Field
Since this solution uses Webflow's CMS to create new forum posts, it's important to first create a CMS collection with a rich text field for forum content.
CMS collection for forum posts with a rich text field
The first step for installing Supersparks, is to select this same collection in the first dropdown, select the rich text field in the second dropdown, select a text field for posts subjects / titles, and click 'Save & Create ID Field'.
Step 2: Rich text content form
a) Paste form template
A key component to every forum, is the form where users can submit new discussions / posts. To enable this, select a template for your new post form.
Webflow rich text form template select screen
Once you've selected a template, you will be redirected to screen where you can copy the template and paste it into a static page in Webflow (pressing CMD + V). Please note, it's not possible to copy & paste Webflow components on Safari.
Copying the template to clipboard
Pasting the rich text form into your static page in Webflow
b) Paste code snippet
After copying & pasting this template, proceed to the code snippet step. After clicking the copy icon of the code snippet, open up your form page's settings, paste the code snippet inside the <head> tag, and press save.
Copying Supersparks' code snippet to clipboard
Pasting the code snippet inside the <head> tag of the page settings
Optional 1: Adapt the design of your form
The goal of Supersparks' template installation is to speed up the process of designing & developing the essential components of forums. But the beauty of this solution is that you can adapt almost aspect of these templates in the Webflow Designer.
In the likely scenario that you are using the all tags (eg. 'All Paragraph, 'All H2s' etc.), these styles will be automatically applied in the rich text editor element (class ql-editor). If you want to make the font styling inside the editor different from these tags (eg. margin, size, font etc), be sure to check out the next section.
Changing the background color of the editor
Changing the color of the icons in the toolbar. You can also replace these with your own icons!
*All templates come pre-installed with the required classes for enabling Supersparks. In case you see any classes for Supersparks (eg. 'supersparks-post-submit-xxxxx'), we recommend not removing them from template elements.
Optional 2: Paste CSS overrides
Certain aspects of the rich text elements can only be adapted through CSS overrides. To simplify this process, Supersparks has a code snippet that can pasted into the body tag of your page settings. These CSS overrides, will by default add margins between line breaks, which will prevent users from pressing enter twice to separate paragraphs or other text elements - in step 4 you will see the importance of this when we use Webflow’s rich text element inside of a CMS page template.
Copying the default CSS overrides
If you're not a CSS expert, do not worry. You can adapt the margins or font sizes, by changing the number to the left to the ‘px’ to the one you desire. It's also possible to adapt the rich text editor’s placeholder text & color in the last section of the code snippet.
Where to adapt the styling of the h3 inputs and placeholder text.
Once your rich text is livelive, you should be able to create a new CMS item from the CMS collection selected in step 1. Plus the rich text input in the editor will be imported into the newly created item's rich text field.
Step 3: Forum Content CMS Page
The next step is to create a page template for the forum content where OP / author data gets displayed & users can respond.
a) Select the template
Similar to step 2) this process requires copying and pasting a template the template page of the CMS template page for your posts. For a forum, we recommend selecting using a template ‘With Comments’.
After proceeding, select a page template, copy & paste it into your CMS page template, and proceed to the next section.
Copying the selected forum post template to clipboard
Next, paste this template into the CMS collection page for where new forum posts are being created.
Pasting this template into the CMS collection page
b) Optional: Adapt design
After pasting, you can get started adapting the design of the template. We recommend making the margins between text elements inside the rich text element to match the formatting from the CSS overrides in step 2.
c) Paste post page code snippet
Next, copy & paste the code snippet inside the <head tag> of the the CMS page template and press save.
c) Connect CMS fields with elements
Finally, the last step is to connect the each CMS field property to their respective element in the page template page.
Connecting the post title field to the element
Connecting the rich text field in the forum collection to a rich text element
Optional: Comment Section
We also, highly recommend decreasing the opacity of the comment section by making the opacity 0% for the comment grid (with class ‘supersparks-comments-grid-xxxxx’). This will prevent the placeholder elements from flickering on screen if comments are loaded in the first frame.
Decreasing the opacity of the comment section before publishing
By selecting a template with comments, Supersparks' commenting feature comes pre-installed. Similarly, you can adapt the designs of the comment section & form in the Webfow Designer. It's also possible customize the settings and add extra functionality for this comment section from by clicking ‘Edit Comment Section’ on the side bar.
Updating the settings of the pre-installed / connected comment section
Step 4 (Optional but recommended): Memberships
Supersparks integrates with two membership tools commonly used with Webflow sites: Memberstack & Outseta. Through this functionality, data from member accounts (name, username, avatar, & up to 3 custom fields of your choosing) will automatically be displayed in the OP / author section (step 4's template) for any content they post into the rich text form (step 2), while logged in.
To set this up, first go to the 'Memberships' section in Supersparks, select the memberships tool you would like to use, click save, and integrate the member fields for each membership tool.
If you haven't done so already, make sure to install Memberstack or install Outseta on your site to enable the different auth functions (login, sign up, logout, etc) of your community.
Memberstack
Unlike Webflow Memberships, the field IDs from Memberstack need to be pasted into Supersparks’ field settings. For example, below is how you would add a field for profession to Supersparks’ custom field 1 slot.
*For Memberstack, be sure to follow this exact process with your connected comment section.
Outseta
For Outseta, the name field comes pre-installed. To display additional rofile data you would like to display with member content, you just need to paste System Names from your custom person properties into Supersparks member field settings.
Copying the JobRole profile system name from Outseta
Pasting system names in Supersparks custom field settings
Member Elements
All of the elements for displaying member name and one custom field inside of the OP & comments section comes pre-installed with the component from step 4. Feel free to remove any elements you don’t want from the template.
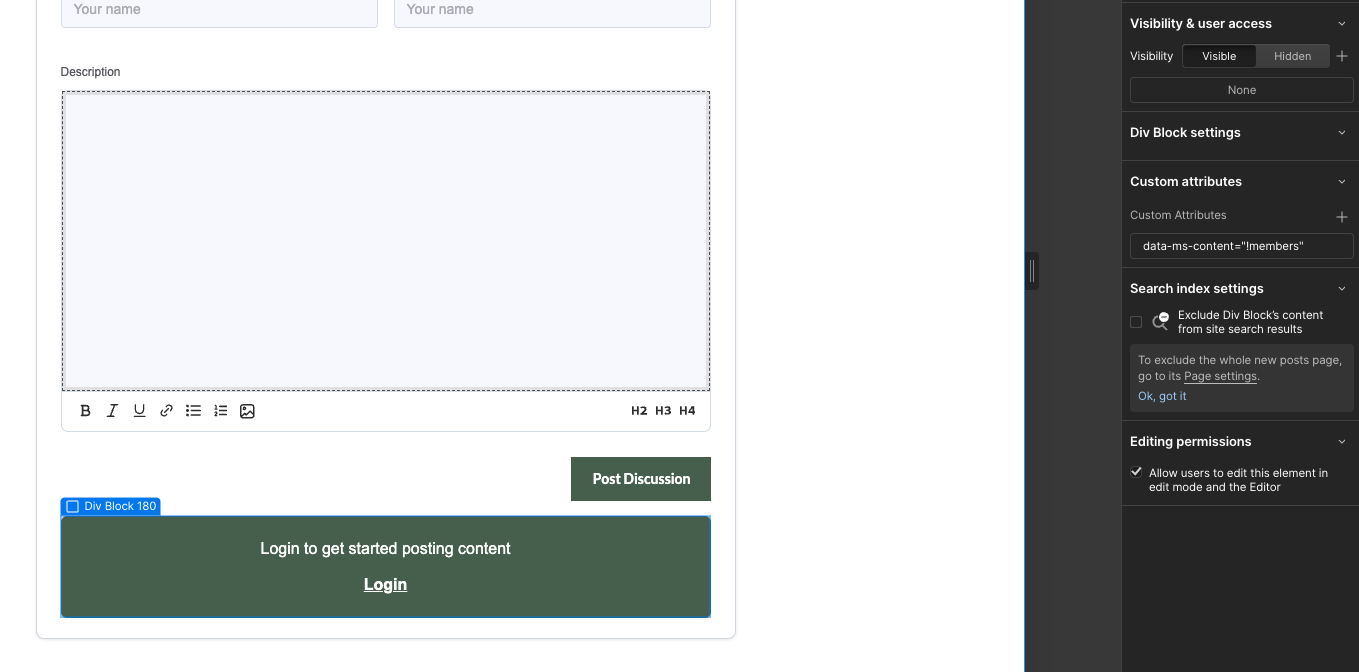
Guest Inputs For Membership Sites
If you also want to allow guests to post content, all of our community posting and commenting forms come pre-installed with guest name and email inputs. When a user is logged in through Outseta or Memberstack these guest input elements will be hidden , since registered members don't need to input these details again when creating content since they are already saved to their account. If an author is logged out, the guest author name provided will be displayed in the newly created posts author / OP section.
Member Only Features
If you want to make your forum member only, we recommend leveraging Memberstack or Outseta's gating features to only show certain elements to logged in users. For example, if you wanted to only allow registered members to post content, you could show the content forms to logged in members and show an element like the one to logged out visitors. Be sure to check out this tutorial for a more detailed guide on setting this up.
Step 5: Collection List Element For Selecting Forum Posts
The last step is to create a collection list element, where users / visitors can browse through forum posts & navigate to one they would like to view. If you would like to create one that dynamically displays author data for each post, you can leverage use one of our components in our extra function for collection lists - these components also come pre-installed with filtering, sorting, and pagination from Finsweet Attributes. Below is a short tutorial for setting this up2:
Step 6: Go live 🚀
Now the fun begins. After publishing your site, you can test out your forum by logging in through your memberships tool, and navigating to the static page with your rich text editor.
After submitting your content, member details should appear in the author / OP section of the forum post and any additional comments posted by members.
Submitting a new forum post in the rich text editor
New forum post created by a member
Comment section where users can respond to the post
Optional Settings
a) Pre-moderation - you can either allow posts to automatically be published to your website. Or if you want more control over content moderation you can manually review and approve every new post that gets submitted to your forum in the Supersparks dashboard. Depending on your selection, be sure to show the relevant success screen in the template from step 2:
Hide the success screen message thats irrelevant to your pre-moderation setting
b) Owner notification - Get notified via email any time a new post gets created.
c) Author notification - Send an email to the author, with a link to their post, when it is first published to your website.
d) URL path - If your CMS collection is nested inside of a folder and has a multi-path URL structure, be sure to input this path of the folder, to ensure Supersparks directs users to the correct URL.
Supersparks' forum settings
Manage Content
Once your website starts receiving content, you can can review all of the forum posts & comments posted to your website in the Supersparks dashboard. It's also possible to publish & unpublish any forum posts to your Webflow site.
Supersparks' content dashboard
Extra features
In the extra features section of our editor and help center, you can find instructions for implementing the following features:


%20(1).png)
%201%20(1).png)
.webp)
%201.png)
%201.png)

.png)
.png)
.png)

.png)


%20(1).png)
.png)